Welcome to ARRI's Color FAQ section. Discover essential insights into color management within camera systems, tailored for cinematographers and filmmakers.
Here, we address common questions about ARRI’s color science to help you enhance your footage and achieve stunning visual results. Explore our expert guidance and take your projects to the next level.
-
-
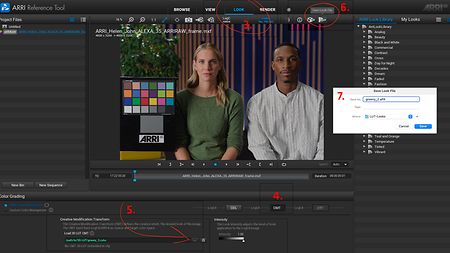
All 3D-LUTs you want to use in ALEXA 35 or ALEXA 265 need to be converted to an ARRI Look File 4. You use our ARRI Reference Tool to do so. You can choose to either use ARRI Color Management (ACM) and olny work with a creative Log-to-Log 3D-LUT (=without output transform/DRT) inside the look file, or if you want to use a custom DRT, use Custom Color Management (CCM) Mode where you would combine your Log-to-Log 3D-LUT with a custom LUT that does the conversion to SDR and/or HDR.
If you have a LogC3-based show LUT, we suggest completely redesigning/visually matching these for cameras using REVEAL color science (ALEXA 35 or newer).
There’s also a guideline which explains the look file creation step-by-step.
-
Yes, next to the default ACM (ARRI Color Managment) you can use your own DRTs in CCM (Custom Color Management). Here's a step-by-step guide on ALF4.
In case you stick with ARRI Color Management, you can choose between different SDR and HDR transforms in camera:
- REC 709 (SDR)
- REC 2020 (SDR)
- REC 2100 / PQ (HDR)
- REC 2100 / HLG (HDR)
All these DRTs are also included in our official ARRI LogC4 LUT Package, which can be used in post-production.
The following table depicts the naming of the in-camera DRT and the corresponding 3D-LUT.
Naming in ARRI LogC4 LUT Package
Naming in ALEXA 35/ALEXA 265 ARRI_LogC4-to-Gamma24_Rec709-D65_v1
REC 709 (SDR) ARRI_LogC4-to-Gamma24_Rec2020-D65_v1
REC 2020 (SDR) ARRI_LogC4-to-St2084_1K_Rec2100-D65_DW100_v1
REC 2100 / PQ (HDR) ARRI_LogC4-to-HLG_1K_Rec2100-D65_DW100_v1
REC 2100 / HLG (HDR) -
To use the Look Library in post production, download the Log-to-Log version for LogC4 here (ALEXA 35, ALEXA 265 or later). Please keep in mind that those need to be need to be combined with the official ARRI Display Render Transform LUT for e.g. Rec709:
Look Library Look for LogC4 (log-to-log) + ARRI_LogC4-to-Gamma24_Rec709-D65_v1
This example would result in a correct image incl. the look for Rec 709. Or you combine the Look Library Look with the official ARRI DRT for HDR:
Look Library Look for LogC4 (log-to-log) + ARRI_LogC4-to-St2084_1K_Rec2100-D65_DW100_v1
-
ALF2 look files are designed to work with ALEXA Mini, ALEXA SXT, ALEXA 65, ALEXA LF, ALEXA Mini LF, as well as AMIRA (all using our ALEV3 sensor). They combine a creative grade (CDL or custom LUT) with a color-space transform.
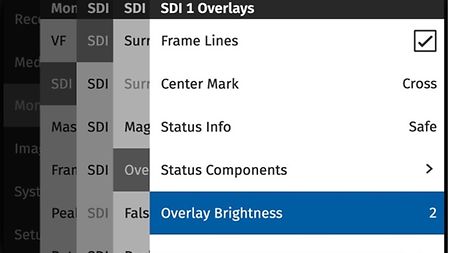
ALF4 is the new generation look file for ALEXA 35 and ALEXA 265. This look file separates the creative grade from the decision which output color space you intend to use. The creative grade is a Log-to-Log 3D-LUT that makes changes “in log” to the LogC4 image. The following output color space transformation is currently determined by the respective setting in the camera, you can choose between:
• REC 709 (SDR)
• REC 2020 (SDR)
• REC 2100 / PQ (HDR)
• REC 2100 / HLG (HDR)All these DRTs are also included in our official ARRI LogC4 LUT Package, which can also be used in post-production. If you prefer using your own DRTs in ALEXA 35/ALEXA 265, this is possible in Custom Color Management (CCM) mode.
In the following table you will find the naming of the in-camera DRT and the corresponding 3D-LUT.
Naming in ARRI LogC4 LUT Package
Naming in ALEXA 35/ALEXA 265 ARRI_LogC4-to-Gamma24_Rec709-D65_v1
REC 709 (SDR) ARRI_LogC4-to-Gamma24_Rec2020-D65_v1
REC 2020 (SDR) ARRI_LogC4-to-St2084_1K_Rec2100-D65_DW100_v1
REC 2100 / PQ (HDR) ARRI_LogC4-to-HLG_1K_Rec2100-D65_DW100_v1
REC 2100 / HLG (HDR) ALF2 and ALF4 look files are not compatible and cannot be converted.
-
Both cameras use our new REVEAL Color Science. REVEAL introduced a new Log C curve (LogC4) for ARRI Wide Gamut 4 color space to make use of the advancements made in sensor technology for ALEV4 while being backwards compatible.
Because the new LogC4 curve is too different from the well-known LogC3 characteristic, a conversion of Look files (or 3D-LUTs) is not possible. Looks/LUTs must be recreated visually in LogC4.
Please note: We highly recommend not to create an inversion of an ALF2 look to create an ALF4 look. This would result in a technically wrong image.
-
With the update to ACES Version 1.3 there was also an update for the ACES IDT for REVEAL (AWG4/LogC4). The ACES Version 1.3 can be implemented by 3rd party vendors e.g. Pomfort already supports ACES 1.3. ACES can be used on the SDI output and in post-production of course. Currently we do not offer an ACES in-camera workflow.
-
For demanding low light situations you have various options to tackle the challenge and enhance your results:
- Make use of the ALEV4's High ISO – 6400ASA
- Use "Enhanced Sensitivity" (ES) Mode
- Apply a Shadow-Texture
Learn how to combine these features for the best result by reading our guide on low light shooting.
-
The HDR10 format is specified by the CTA (Consumer Technology Association) and is incorporated into the UHD Premium standard. HDR10 uses static metadata (SMPTE ST 2086) to describe the mastering display and mastering color space. The format is currently not backwards compatible with SDR TVs.
-
In still photography the term HDR is used in a different context to describe a technique to capture more dynamic range by stacking several exposures done with different shutter speeds. The result (rendered for a Standard Dynamic Range display) creates a “hyper-realistic” looking image. Recent smart phone cameras often use this method to capture HDR images.
The term HDR used in a motion picture context focuses on the capture and displaying of HDR images. These are images with more detail in the highlights and shadows shown on an HDR display. ARRI digital cameras capture the highest dynamic range of any camera, and thus have been capturing HDR images since we introduced the first ALEXA camera in 2010. In contrast to still photography HDR, ARRI digital cameras capture a high dynamic range image at one point in time, and thus avoid any motion artifacts that would result from capturing different exposures at different times.
-
Dolby Vision is a “high quality, high dynamic range and wide color gamut system for delivery of entertainment content” (from the Dolby Vision White Paper).
Dolby Vision exists in two versions today:
- 1. Dolby Vision Home for TV distribution
- 2. Dolby Vision Cinema for cinema distribution.
Dolby Vision uses the SMPTE 2084 (PQ) EOTF for distribution and Dolby Vision Home uses additional dynamic metadata (SMPTE ST 2094) to be compatible with SDR displays.
In terms of brightness, Dolby Vision is specified from 0 to 10,000 nits. Today’s display technology (2017) is capable of 0,005 to 4,000 nits (Dolby Vision Mastering Display). Standard Dynamic Range in comparison is specified from 0,05 to 100 nits.
-
Here's a step-by-step guide for using ARRI Color Management:
First you need a 3D-LUT. This must be a Logc4-to-LogC4 LUT as a *.cube file with 33 or 65 mesh points.
- Open the ARRI Reference Tool
- Load an ALEXA 35 or ALEXA 265 clip to verify the LUT’s effect
- Change to [LOOK] room.
ART loads this room with ARRI Color Management loaded and for the first step: Editing [CDL]s - Change to [CMT]
- Select your LUT
In this tab of the look panel you’ll see a textbox with three points to browse to our 3D-LUT. - The on the upper right of the view port, select the [color fan] icon to export your ALF4.
- Choose a name and a destination
- And that’s it.
-
Generally speaking, you need to export the look as a 3D-LUT and combine this into an ARRI Look File.
For ALEXA 35 or ALEXA 265 this needs to be a Log-to-Log 3D-LUT based on actual LogC4 footage ("Creative Modification Transform"); the transform to Rec 709 can be either handled by the camera/ARRI Color Management or by using a custom Display Render Transform (DRT). Use the ARRI Reference Tool to create an ARRI Look File 4.
For all ALEXA and AMIRA cameras using the previous look file format (ALF-2), the look must be based on LogC3 footage. A 3D-LUT to use in an ALF-2 needs to have a transform to Rec 709 baked-in. Use the ARRI Color Tool to create the look file.
-
The ARRI Look Library is available free of charge. You can download the whole package in the corresponding ARRI Look File format or as 3D-LUTs. Pick ALF-2/LogC3 for all cameras but ALEXA 35) and ALF-4/LogC4 for ALEXA 35 or ALEXA 265.
To find the downloads please head to our look files website.
-
There are different parameters for sharpness, detail and the ARRI noise redcution and in what way it will affect the final image. A more detailed explanation regarding all settings you will find in our ARRI Texture Control Whitepaper.
This does not apply to ALEXA 35 cameras, which have a dedicated feature called "ARRI Textures" to control the image.
ALEXA 265 has fixed sharpness, detail and noise reduction settings. -
The ARRI Look File 4 (ALF4) is our 3rd generation look file used in ALF4 (ALEXA 35, ALEXA 265, or later).
An ALF4 allows the use of ASC CDL as well as 3D-LUTs for creative grade (Creative Modification Transform) and for colorspace transfomation (Display Render Transform). ALF4's can be created and extracted using the ARRI Reference Tool.
-
The ARRI Look File 2 (ALF2) is our 2nd generation look file used in ALEXA SXT, Mini, AMIRA, ALEXA LF and ALEXA Mini LF. The ALF2 supports ASC CDL as well as the use of a 3D-LUT for custom color transformation to Rec. 709, 2020 or P3 color spaces. Use the ARRI Color Tool (legacy) or 3rd party software to create an ALF2 look file.
-
Yes. It’s a bit more contrasty, which can bring out more detail.
In the ARRI color processing architecture, the basic system tonal response comes from a sigmoidal curve influenced by camera 'black gamma', 'gamma' and 'knee' controls. In the ACES color processing architecture, the basic system tonal response comes from the Reference Rendering Transform [RRT].
The tonal response curves are somewhat different, because of a philosophical difference between the systems' authors: ARRI delivers by default a flatter image in midtones and highlights, as shown in the graph (see image 1).
In the image 2 below, a cropped region of an ALEXA-captured frame is shown rendered with the traditional ALEXA rendering on the left and an ACES rendering on the right. The ACES rendering shows increased contrast at the edges of the paving stones, and the separation of the curb from the sidewalk is much more evident. The contrast between lit and shaded blades of grass is also increased in the ACES rendering.
The lower-contrast ARRI rendering is by design, not by accident: most ARRI camera users will be doing a later grade, and the ARRI rendering transform emphasizes showing latitude to a cinematographer over showing a near-final image. In another crop from an ALEXA-captured frame (see image 3), a close-up of a rim-lit sweater sleeve shows that the ACES viewing transform renders the fabric "higher" on the tone reproduction curve.
This can be seen more clearly in an exposure wedge (see image 4), where it is evident all the image detail shown in the ARRI rendering is still there in the ACES image and can be revealed with a simple color grade that moves that content down the exposure curve. Once again the ARRI rendering prioritizes the cinematographer’s decisions about capture – "Am I done shooting this?" over decisions about finishing – "Is this the look I want to deliver?"
-
Very similar on the front end; mostly similar on the back end. Both systems are flexible but achieve that flexibility differently.
The diagram below compares the high-level ARRI and ACES processing pipelines. Starting from a common buffer of image data, each pipeline transforms the raw data into its own encoding space – ALEXA Wide-Gamut for the former, ACES for the latter – then applies any creatively-determined color adjustment, and then transforms the possibly-adjusted image for viewing on some specific display device (e.g. a monitor or projector). See image 8.
In the ARRI pipeline, systematic changes to the look of the image, such as a sepia-tone look for older material, are blended in to the 3D LUT that implements the default "look". The ACES pipeline explicitly separates creative color grading from more constant and uniform-across-the-frame color grading, by formalizing the latter as Look Modification Transforms (LMTs). Nevertheless, it is easy to see that the pipelines are very similar.
The ACES pipeline in the lower part of the diagram is actually more general, in that in theory there is no limit to the number of LMTs that could be inserted into the pipeline. This contrasts with the ARRI pipeline in the upper part of the diagram, which is less flexible by design – since it has to run in real-time inside the camera.
-
Productions that are willing to take the time to test ARRI’s native workflow with content appropriate for their needs, and who can similarly test ACES-based workflows with that same content. Since ARRI does not record native ACES container files (OpenEXR files with ACES imagery and metadata) in their cameras, an initial test can be done without having to shoot the content twice.
ACES is the best vendor-agnostic solution to the problem of how to mix the output of sometimes very different cameras. Productions trying to do this without ACES are either in for an enormous amount of trial-and-error color matching, or an ambitious exercise in reverse engineering, some of which may be proscribed by the camera manufacturer.
ACES may also be the best solution if production is dealing with VFX vendors who don’t have staff that understand concepts such as scene-referred compositing and consistent color spaces for camera output. While it is true that all the large VFX vendors have understood these ideas for years if not decades, it is common for ‘garage shop’ small vendors to be at a loss when confronted with challenging composites mixing the output of disparate devices. ACES can help these facilities ‘punch above their weight’.
-
The ARRI Look File 1 (ALF1) is our discontinued Look File an was replaced by the ALF2 (ALEXA SXT, Mini, AMIRA, Mini LF) and ALF4 (ALEXA 35 and later).
The ALF1 can not deal with any 3D-LUTs and only use printer lights, saturation and CDL values.
Use ARRI Look Creator (ALC) to create ARRI’s Look File 1 (ALF1) to use in ALEXA Classic and XT. Based on a *.dpx still frame you can create look by using printer lights, saturation and CDL values.
ALC is a free application for Mac and Windows computers.
Please note: The ARRI Look Creator (ALC) and the ARRI Look File 1 (ALF1) is end-of-life (EOL) and has been discontinued. Nevertheless there are still possibilities generating looks for your ALEXA Classic and XT. Please have a look here...
-
Conversion of ALF-1 looks is easily possible with our ARRI Color Tool. Open your ALF-1 (*.xml) look file and export it as an ALF-2 look file (File > Save Look as).
-
They are different. The ACES skin tone rendering, when applied to ARRI camera output, tends to be "tawny", that is to say, for ARRI camera output ACES will render skin a bit more yellow. Whether this is a welcome or unwelcome change will depend on the subject and the context.
In the crop from a winter scene below, the ARRI rendering on the left is both less contrasty and less saturated. In the ACES rendering on the right, contrast and saturation are increased, and the skin tone shifts to be slightly more tawny. The right rendering looks, plausibly, like a colder day than the left, bringing out more color to the cheeks. See image 5.
In some cases the ACES rendering will render a "cold" subject somewhat warmer, as seen below. See image 6.
As one would expect, if someone has a naturally florid complexion, or is sunburned, such that their ruddiness in the ARRI rendering is at the limit of what a cinematographer would desire, then the ACES rendering could require some "dialing back" in the grade. This can be true for both the skin itself, and the highlights on the skin. In the tungsten-lit scene below, the ACES rendering shifts the skin highlights so that they are more yellow. See image 7.
To sum up: the ARRI rendering and the ACES rendering process skin tones slightly differently, and which is preferable will depend on the cinematographer’s taste for contrast and saturation in their subject’s default rendering.
-
The Look Library "for post production" is available as Log-to-Log 3D-LUTs (*.cube) for LogC3 and LogC4 on our Look Files Website.
Some 3rd party applications are able to read the ALF-2 information directly out of the ProRes clip or ARRIRAW file header (e.g. Blackmagic Design’s “DaVinci Resolve Studio”).
-
At the current time, the ARRI Look Library is only available for ALEXA cameras with advanced color management. ARRI is currently in discussions with third parties to provide LUT boxes or monitors that will also have the ARRI Look Library build in.
-
This question has two answers.
A1: Chromatic abberation in some wide-open lenses can produce very saturated blue or purple fringes around strong light sources adjacent to very dark areas, such as the headlights of the cars in the nighttime scene below. When these colors are mapped into the ACES color space, they can fall outside the gamut of colors that the ACES rendering transform is designed to handle. The resulting color clipping manifests itself as an unpleasant artifact.
The ARRI rendering (again, the ARRI crop is on the left) was specifically designed to be more forgiving in this circumstance, in that it provides a "soft falloff" to the color boundary; the ACES rendering on the right has a very sharp edge to the purple region surrounding the bright white of the headlight. See image 9.
Going from about a 5X blowup to a 15X blowup, in extreme close-up the difference is clear. See image 10.
It should be noted that, in a subsequent take with the lens closed down one stop, the purple fringing was much reduced, and the problem virtually eliminated. The point here is not to show the better handling of the edge case in the ARRI rendering, but rather that to demonstrate the edge case so that it may easily be avoided.
A2: ACES isn’t a ‘universal cure’. The difficult problems that come with near-monochromatic stimuli, mixed lighting, etc., are still present in ACES; there is no ‘free lunch’. If you’re aware of this, and avoid the ‘gotcha’ of being buzzword-driven rather than needs-driven, then do your standard pre-production tests, use our documentation, and you will get predictable, solid results.
-
The looks appear as an additional source beside the USB stick in the look import dialog ("LOOK LIB"). In order to use the look, it must be imported into the list of active looks. In order to be able to modify the CDL parameters of that look, the look must be duplicated and renamed.
-
Yes. ARRI provides a downloadable zip file containing a sample ARRIRAW file and derivative images, including a Log C DPX frame, an ACES OpenEXR frame and display-ready frames. These can be used to verify that your ACES pipeline is producing results that match ARRI’s reference results.
-
An ALF1 can still be created by our ARRI Look Creator (ALC), but the software is EOL and is not maintained since OSX 10.8.
There are 3rd party possibilities to create ALF1 files with:
Pomfort Livegrade Pro
The ALF1 functionality was removed from the Livegrade GUI, but it can still be made visible by importing this sample Pomfort Look File (*.plf). Select File -> Import Look as Shot -> Pomfort Look (plf).
Lattice
With Lattice it’s still possible to convert a 3D-LUT/Look and generate an approximation ALF1 *.xml Look file for the ALEXA Classic series. Select File -> Export Approximate -> Arri Look XML.
External LUT Box
It's also worth considering external 3D LUT boxes as an option:
AJA Color Box
Flanders Box IO
Teradek COLR
TV Logic IS mini (former Fuji IS mini LUT boxes)
-
ACES is an alternative workflow to ARRI’s standard workflow. The standard tools almost all support ACES now. We think that if you do choose after testing to go with an ACES workflow, that ARRI provides the best and most comprehensive ACES support of any camera vendor.
-
The ARRI Look File 2 enables different ways to influence the image on ARRI cameras. Here’s an overview on the workflow:
-
The in-camera ARRI Look Library files are protected. You have to rename your exported look name before loading it back to the camera. Rename the exported “1110-1.aml” file to a different filename, such as “1110-1_v2.aml” on the system to which the Look was exported.Then import the renamed look back into the camera.
-
An Ethernet or WIFI connection to the camera is the key element in a live grading setup. We’ve created an overview to show the big picture of such a setup:
-
ALEXA SXT, ALEXA LF, or ALEXA 65
Transfer the looks via SD-card: place the desired looks in the look files subfolder: ARRI/Alexa/LookFiles. Install each look via the camera menu: COLOR > LOOK FILE > ADD.
ALEXA Mini LF
Transfer the looks via USB drive: place the desired looks in the look files subfolder: ARRI/A-MINI-LF/LOOKFILES. Install each look via the camera menu: MENU > LOOK > LOOK > ADD.
-
Yes, ACES does not alter the camera specifications.
-
ARRI Look File 1 offers CDL-like controls as well as printer lights, saturation and a user-definable tone mapping curve. The ALF-1 does not apply LIFT/Gamma/Gain before but after the conversion to REC 709. Usually CDL is done in Log C because there’s more image information in Log C (low- and highlights) still there to work with.
ARRI Look File 2 offers full CDL and 3D LUT or Video Look Parameters. Look files in the file header can be utilized in post. The ALF2 enables support for REC 2020 (please see second question: "What is Rec 2020") and provides the option for live grading.
ARRI Look File 2 – Using the ALF2
ARRI Look File 2 - Looks in Editorial -
Beginning with ALEXA Classic cameras SUP 3.0 until SUP 7.0 ARRI offered a film style matrix that could be applied to the Log C output. The same transform was also available as a 3D-LUT for post-processing of Log C footage.
The film style matrix makes the color characteristics of the Log C image similar to negative film scanned on an ARRISCAN. The matrix is most usefully applied when the data is previewed or converted with a print film emulation (PFE) . This is the common workflow in Digital Intermediate where the PFE is applied as a 3D-LUT in the display path.
The film-matrix can in some situations achieve a bigger color separation and therefore make the keying of some shots easier.Due to new developments in color grading and digital workflow our film style matrix has been discontinued.
-
Rec 2020 is a wider color space than Rec 709, which is the current industry standard for HD. Rec 2020 promises more brilliant images, though only new display technology is able to show these. Traditional Rec 709 displays (like TVs or ordinary computer displays) can’t display Rec 2020.
While Rec 709 (short for Recommendation ITU-R BT.709) is the encoding color space for HDTV, Rec 2020 is the encoding color space for UHD. The primary colors lie on the spectral locus and it is thus possible to have more saturated colors in images. (It does not mean, however, that all colors look more saturated. When properly converted, a Rec 709 image will look exactly the same when displayed on a Rec 2020 display.)
Rec 2020 is an encoding standard. A TV or display may not support the full gamut. Nevertheless, it will correctly display the colors within its physical gamut. To get the “Premium” logo of the UHD Alliance, for example, a TV needs to support a minimum of 90% of the P3 gamut.
-
Yes, since the very first ALEXA back in 2010!
Find out more on HDR in our separate HDR FAQ
-
As explained in the answer "What is Log C?" the maximum value of the Log C function depends on the exposure index. In a video image, however, one wants to have the clipping point of the sensor represented by the maximum signal (100%) regardless if this clipping point is 6, 7, or 8 stops above mid gray. Therefore, the LUTs for conversion from Log C to Video normalize this range, e.g. the video signal range will always go from approx. 1% to 100%.
This normalization is done always in the camera. For post-production, it’s possible to use a LUT that is computed without this normalization step, and it’s called “photometric” (the name is a bit misleading). When one works with a timeline of shots recorded with different settings of the exposure index, it’s easier to use one conversion LUT for all.
One side effect of this normalization is that you get lower blacks. Users who want to use a single LUT while maintaining the look of the image as output by the camera should use the LUT computed for EI 800.
-
This is an encoding where the digital values are proportional to the relative brightness in the scene. In more technical terms it’s said that the digital values are radiometrically linear. Scene Linear files are stored in a 16bit float container and are mostly used for VFX pulls.
-
The Color Decision List CDL or ASC CDL) is a format for the exchange of metadata information about a basic primary color grading between the camera and post-production software. The American Society of Cinematographers (ASC) defined four functions for the CDL: Slope, Offset, Power and Saturation.
-
A color gamut is the range of reproducible colors available on a certain device such as a display for example. A display may have a color gamut that exceeds a certain color space which itself is a subset of the visible spectrum of the human eye.
The color gamut is described by its three primary color values (red, green and blue), which define all possible colors for a color gamut inside of a triangle spanned between these primary colors. The primary colors therefore also define the outer boundaries of the gamut of the specific device. A display cannot produce colors that are outside of its gamut.
-
A 1D-LUT describes a transformation applied to each of the red, green and blue (RGB) channels independently. A 1D-LUT contains an input value for each of the three colors and a corresponding output value. So for a given value of R, G, or B input, there is a given value of R, G, and B output.
-
This is not an error! You have chosen to record in “Log C” – ARRI’s native color encoding. Opposed to a “video” image (in REC 709 color space) Log C maintains more details in the lowlight as well as in the highlight areas. Log C is also referred to as the camera negative as it is unprocessed footage.
-
Here's an overview on ALF-1/ALF-2 support in 3rd party tools:
-
DCI-P3 color space has been removed from the ALEXA camera menu for reasons of simplicity. A conversion LUT, LogC3 to DCI-P3, can be generated via our LUT Generator.
-
The Log C curve is a logarithmic encoding of the scene, meaning that the relation between exposure measured in stops and the signal is constant over a wide range. Each stop of exposure increases the signal by the same amount. The overall shape of the Log C curve is similar to the exposure curves of film negatives. Because of fundamental differences between a sensor and negative film, however, the color characteristics remain different.
Log C actually is a set of curves for different EI values/ASA ratings. Each curve maps the sensor signal, corresponding to 18% gray scene luminance, to a code value of 400 (LogC3)/308 (LogC4) in a 10 bit signal. A 10 bit signal offers a total code value range of 0 to 1023. The maximum value of the Log C curve depends on the set EI value. The reason is quite simple: When the lens is stopped down, by one stop for example and the EI setting is increased from, say, 800 to 1600, the sensor will capture one stop more highlight information. Since the Log C output represents scene exposure values, the maximum value increases.
-
As most of the postproduction tools use their own notation for look up tables, ARRI offers conversion LUTs through the online LUT Generator (for LogC3 only! here's the LUT package for LogC4) which can create over a dozen different LUT formats.
When dailies are going to be color timed, the colorist may prefer using a photometric conversion LUT as he or she will use just this one LUT for all shots and perform adjustments to the black and white levels anyway. An example of LUT generator settings for color-corrected dailies are shown below. For an automated dailies process, the normalized LUTs must be used in order to compensate for the different ASA settings on the camera.
If „ARRI Look File 1“-looks were created and used during the shoot, they can also be converted with the ARRI Color Tool to create 3D LUTs that include look file adjustments (Choose preset "Look"). This will allow the creation of Dailies including the intended look from the DP.
-
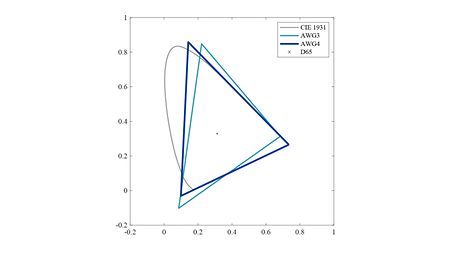
"Wide gamut" is a generic term for color gamuts that are larger than Rec. 709, i.e. P3 or Rec. 2020. ARRI Wide Gamut 3/4 is the name of the color encoding space used in combination with Log C.
-
3D-LUTs are more powerful than 1D-LUTs as they can cross-convert colors between channels and independently control saturation, brightness and contrast. However, they are significantly larger than 1D-LUTs and require some computation, since they only store some key values and any in-between values are interpolated.
-
The values of the primaries in an image from the sensor of a digital camera relate to the amount of light seen through red, green and blue color filters. There are no colors a camera can’t see, so it does not really make sense to talk about the gamut of a camera. It is, however, necessary to describe the color space used to encode the colors, which in case of the ALEXA camera is called the ARRI Wide Gamut color space.
-
ARRI always strives to deliver the best overall image quality. As part of that we’re continuously improving our color science.
With the new ALEV4 sensor we've taken our color science through its biggest rewrite since we introduced the ALEV3 sensor in the first ALEXA in 2010. We've made various improvements over the years, but our color science never really came to a rest. In these last years LogC3 became famous throughout the industry. With ALEV4 LogC3 had to change to hold all the dynamic range the new sensor if capable of. So all is new: ARRI Color Engine, ARRI Wide Gamut 4, LogC4. To sum it up we call the new color science REVEAL.
The good news: REVEAL is compatible with ALEV3 cameras. One can de-bayer ALEV3 ARRIRAW to ARRI Wide Gamut 4/LogC4 and use all the benefits of REVEAL. If shot in ProRes – no worries LogC3 is and will be supported in all post tools through our SDK.
-
To get a good, correct color representation, you typically want to adjust the white balance of the camera to the lighting of your scene. As a result, the live output and recorded image of a neutral grey target should not exhibit a color cast (at least while no artistic look is applied). Since it may be difficult to see a color cast depending on the viewing environment, the best way is to look for a color shift with an RGB waveform display or a vecorscope display.
The camera offers two dials that allow you to set the white balance:
- the color temperature [K] will move the white point between blue and red, or "colder and warmer".
- the tint or color cast [CC] will move the white point between green and magenta or "plus and minus green".You can either set these values manually or have the camera calculate an automated white balance while it is looking at the neutral grey target.
-
Material recorded in Rec 709 (short for ITU-Recommendation BT.709) has a display specific encoding or a, in other words, "what you see is what you get" characteristic. The purpose of a display specific encoding is to immediately provide a visually correct representation of the camera material, when it is screened on a certain display device. This is achieved by mapping the actual contrast range of the scene into the contrast range that a display device can reproduce. Examples of display specific encodings are Rec 709 for HDTV screens or DCI P3 for Digital Cinema Projectors. On the downside, a display specific encoding puts some limits on the options for a colorist.
-
Use the ARRI Color Tool (ACT) to create ARRI’s Look File 2 to use in ALEXA SXT, ALEXA Mini and AMIRA. Based on a Log C-clip or a *.dpx still frame you can create looks using Color Decision List (CDL) parameters, “Video Look Parameters” (VLP) or import 3D LUTs created in a grading session.
ACT is a free application for Mac and Windows computers.
Please note: The ARRI Color Tool has been discontinued. The functionality will be covered by our ARRI Reference Tool (ART) from now on.
-
Use ARRI Look Creator (ALC) to create ARRI’s Look File 1 (ALF1) to use in ALEXA Classic and XT. Based on a *.dpx still frame you can create look by using printer lights, saturation and CDL values.
ALC is a free application for Mac and Windows computers.
Please note: The ARRI Look Creator is end-of-life (EOL) and has been discontinued. Nevertheless there are still possibilities generating ALF1 looks for your ALEXA Classic and XT. Please have a look here...
-
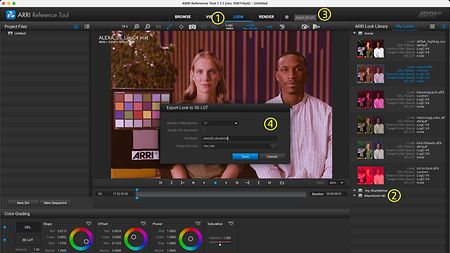
You use our ARRI Reference Tool (ART) to do so. Download ART here.
1. Open the ARRI Reverence Tool. No need to import a clip. Change to the LOOK room.
2. Use the file browser in “My Looks” to find your look file *.alf4 on your storage. Select it. ART automatically applies your look to our Reference Image of Helen and John for reference.
3. Choose “Export 3D LUT” from the tool bar.
4. A pop-up windows opens. Set your LUT size, file name and location to save the file. -
ASC CDL (Color Decision List) is a standardized format to exchange and specify basic color grading information. It contains slope, offset, and power controls for the red, green, and blue channels as well as a saturation parameter for the entire image.
-
The EOTF (Electro-Optical Transfer Function) is a method to convert a digital signal back into visible light. It is used by displays to convert a recorded or transmitted signal into light, and thus an important part of any HDR specification. The EOTF for HD distribution has often been called “gamma curve”, since the EOTF of CRT displays is a power function. ITU Rec 1886 states that the reference EOTF should be a power function with an exponent of 2.4. For HDR distribution two new EOTF curves were introduced: PQ and Hybrid Log Gamma (HLG).
-
WCG is a generic term for color gamuts larger than Rec 709 (e.g. Rec 2020, DCI-P3 and others).
-
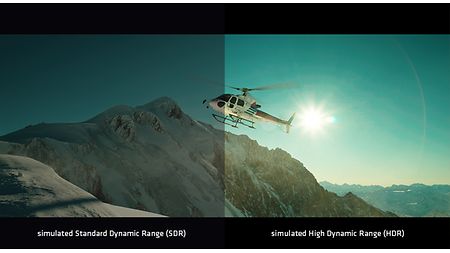
HDR is short for High Dynamic Range, a term that describes images with deeper blacks and brighter whites, leading to a higher contrast ratio than what was possible up until now. In the last years, the term HDR has mainly been used to describe new display technologies which have a greater dynamic range and therefore can display images with a higher dynamic range. While a higher contrast in images is great on its own, it also makes the image look sharper, increases color saturation, provides more depth and allows for a larger range of looks.
HDR is considered an important new technological step in image display since it provides an immediately visible clear improvement in image quality, even to the untrained eye and independently of image resolution, screen size or viewing distance. In addition, the increase in data rate for an HDR signal is minimal, thus creating great visual impact for small increase in cost. -
Standard Dynamic Range (SDR) compared to HDR is the regular contrast ratio we are used to from TV sets and in the cinema.
-
HDR acquisition is capturing images with a high dynamic range for distribution and display on a HDR display. When you’re on a job capturing footage for a show designated to have HDR deliverables, make sure you are using a sensor/image-processing and post pipeline that is capable of capturing sufficient latitude for a HDR display. The richness and fidelity and therefore the grading possibilities of an HDR image are defined in the acquisition phase.
-
-
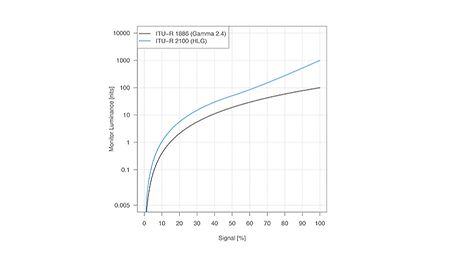
The Hybrid Log Gamma curve is an HDR standard defined by NHK and BBC. It is specified in ITU Rec BT 2100. The HLG specification offers a degree of compatibility with legacy displays by more closely matching the previously established television transfer curves (ITU Rec 1886). The HLG signal is similar to about 0.6 signal to Rec 1886 and then changes to log encoding for the highlights. This makes it backwards compatible with SDR displays without the need of metadata.
Below is a comparison of an SDR signal encoded to a maximum brightness of 100 nits and an HLG signal encoded to a maximum brightness of 1000 nits. Note that the vertical axis is logarithmically scaled.
-
An HDR display is a display that can produce a higher than “standard” contrast ratio. In the past, TV sets have had a maximum brightness of 100 nits, and cinema displays up to 48 nits. How much brighter an HDR display has to be to be considered an HDR display is not clearly defined. The only cinema HDR projection so far is based on laser technology and has a brightness of 108 nits. Recent HDR consumer TV sets are based on active backlight or OLED technology and have a maximum brightness of 500 to 1000 nits.
-
The Perceptual Quantizer (PQ) transfer curve was defined by Dolby Laboratories and has been standardized as SMPTE ST 2084. The PQ curve is a new EOTF for HDR distribution.
-
There is one general HDR standard (Rec 2100) and a number of different distribution standards, of which three are the most popular (for a detailed description of all standards see our "HDR Standards" section below):
- Dolby Vision
- HDR10
- Hybrid Log Gamma (HLG)
These are some terms which are currently used in conjunction with these HDR implementations. They are explained in all detail in the sections "HDR Standards" and "HDR Terms ".
- EOTF
- PQ
- SMPTE ST 2084
- Rec 2020
- Rec 2100
-
SMPTE ST 2084 is a new EOTF standard for HDR displays. It’s also known as the PQ curve. The PQ EOTF achieves a very wide range of brightness levels for a given bit depth using a non-linear transfer function that is finely tuned to match the human visual system. The transfer curve encodes absolute luminance values up to 10,000 nits. This is a radical change from previous EOTF definitions.
-
This ITU standard defines two different EOTF’s for HDR displays: the PQ transfer function and the HLG transfer function. It’s expected that the PQ curve is rather used for dramatic content productions while the HLG curve is used in broadcast applications. The standard further defines the viewing conditions and monitor parameters for critical viewing of HDR content.
Parameter
Values
Background and Surround
Neutral grey at D65
Brightness of background
5 cd/m2
Brightness of surround
≤ 5 cd/m2
Ambient lighting
Avoid light falling on the screen
Viewing distance
for 1920 x 1080 format: 3.2 picture heights
for 3840 x 2160 format: 1.6 to 3.2 picture heights
for 7680 x 4320 format: 0.8 to 3.2 picture heightsPeak luminance of display
≥ 1 000 cd/m2
Minimum luminance of display (black level)
≤ 0.005 cd/m2
-
Our colleagues of ARRI Media only sell the whole bundle.
-
Please ask our colleagues at ARRI Media, as they can provide the Looks for different color spaces.
-
No, not yet, but future releases of the ARRI Color Tool (ACT) will have the ability to preview the ARRI Look Library.